


The first thing to do is to measure the height where your stairs will go. 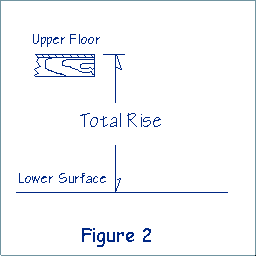 This is your most important measurement. It is called the total rise. Every other measurement depends on it. The total rise is the vertical distance between the surface of the higher floor and the surface of the ground, sidewalk or the lower floor that the last step will be on (see Figure 2)
The total run is the horizontal distance between the edge of the upper floor and the end of the bottom step.
 Each step has two basic measurements. The horizontal or flat part of the step is called the run. The vertical height difference between two steps is called the rise. The riser is the vertical part of the step between a tread and the underside of the tread above it. The part of the step that sticks out past the riser is called the nosing. The dimension of each step depends on a number of factors. Your stairs can be steep or gradual. The rise of each step can vary as well as its run. (see Figure 3)
To prevent the steps from being too steep or too gradual (see Figure 4), there is a relationship or proportion between the rise and the run. The Building Code says that the rise must have a maximum of 200 mm (7 7/8") and a minimum of 125 mm (5"); the run has a maximum of 355 mm (14") and minimum of 210 mm (8 5/16"); the tread depth has a maximum of 355 mm (14") and minimum of 235 mm (9 1/4"). The tread depth is the run including the nosing. The nosing cannot be more than 25 mm (1"). You should check the building code of your own region before building or renovating anything structural for your home.
An old adage says that for older people 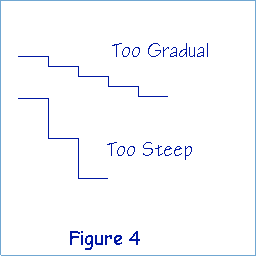 the ideal rise is 6" with a run of 12". An intermediate rise is 7" and the run is 11". The steepest should be no more than a rise of 7 7/8" and a run of 10" . Notice that, in each case, the run plus the rise equals 18". This is the simplest way of determining rise and run but the size of each step is totally up to you as long as they are within Building Code ranges. The ideal run and rise for a dwelling based on a 92 1/4" stud, 3-1 1/2" plates, 2x10 floor joists and 5/8" subfloor is 14 rises of 7 5/8" and 13 runs of 10 1/2" with a 1" nosing.
The preferred angle of stairs is around 30 – 35 degrees. There are three generally accepted rules for calculating the ideal rise to run ratio:
- The sum of two risers and one tread is 24" to 25"
- The sum of one riser and one tread should be 17" to 18"
- The rise times the run should be between 70" and 80".
To keep each rise the same size, you'll need to make some calculations. Follow these steps:
- Measure the total rise (distance from the surface of the upper floor to the surface of the lower floor). If your measurement is in feet and inches then convert it into inches only. Example: 8'-10 3/4" is 8 x 12 + 10 3/4 = 106 3/4 or 106.75
- Decide on the size of the riser you want for your stairs, say 7 1/2 inches.
- Divide the total rise (measurement from 1 above) by the size of the riser you decided on: 106.75 / 7.5 = 14.23.
- The result of the calculation will probably not be a whole number (one without a fraction). There will most likely be a remainder or fraction. Choose the nearest whole number to the answer of your calculation, i.e. 14. This is the number of rises in your set of stairs. To calculate the exact rise, divide your total rise by the number of risers, i.e. 106.75 / 14 = 7.625 or 7 5/8".
- As we previously mentioned, there is one less tread than riser, so in our example of 14 rises there would be 13 treads.
Nail the stringers in place, securely to the top floor trim joist and to the bottom floor, or to the side walls. Next is installing the steps or treads. In our example we chose 1" plywood for the treads. Since our stairs are inside a house and will be carpeted, we will choose a nosing of 1" giving us a tread width of 11 1/2". Rip the 1" plywood 11 1/2" wide and the length to match the width between the walls less 3/4" on each side for the drywall to slip down. The width of the stair case is important as well. The minimum width is 860 mm.(33 7/8"). I prefer a width of 36" if appliances or furniture have to be moved up or down them. If your stairway is wider than 36" put in extra stringers to support the longer treads.


 Step 3: Hang Panel
 Step 4: Fasten Panel
 Step 5: Fit Upper Panels
 Step 6: Cut Around Outlets
 Step 7: Fit Lower Panels
 First Coat of Joint Compound
 Tapered Joint
 Step B:
  Inside Corner
 Screw Indentations
 Step 1: Second Coat
 Step 3: Sand